
Sharing customized books is great way to collaborate with teachers in your school or district.
View Customizations of a Resource
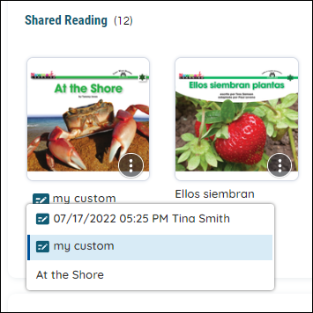
You can view the customizations of a resource by selecting the resource title.
- Find a customized resource from your library or bookshelf.

|
If a resource has a customized version available, a customization icon will appear next to the resource title. A customized resource appears with a blue title. |
- Click the resource title. The Customizations dropdown appears.
- Click a title to choose a customization.
|
|
The original resource appears at the bottom of the Customizations list. Use the original resource to create additional customizations, if necessary. |
View Customizations from the Resource Options modal
You can view all the customizations of a resource from the Resource Options modal.
- Find a customized resource from your library or bookshelf.
- Click on the More Options icon to open the Resource Options.
- Press the Customizations tab at the top to see all available Customizations.
- Select a customization by clicking on the blue mark in front of the title and press Preview.
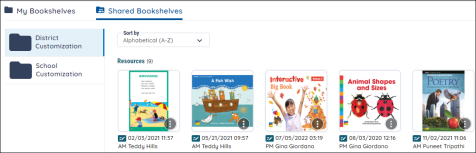
Share Customizations with all Teachers and School
You can share your favorite customizations with all teachers in your school or schools in your district by using the School or District Customization Library.
Before you start
- You can only customized eBooks or ePocket Charts
- You will receive the following message: Share customized books only if you attempt to add non-customized books or assessments to the School or District Customization Library.
- Shared customizations cannot be edited or removed by other teachers in the School or District Customization Library. Only you, as the original author of the customization, can remove a customization from the School or District Customization Library.
- Teachers cannot delete the School or District Customization Library.
- Teachers cannot edit the School or District Customization Library name.
Share customizations
- Select a customization from your library or bookshelf. Books with a customization icon below the title are eBooks with customizations.
-
Drag the customization to the Bookshelves button.
- Select either the School Customization or District Customization bookshelf from the dropdown. They are the first two options.
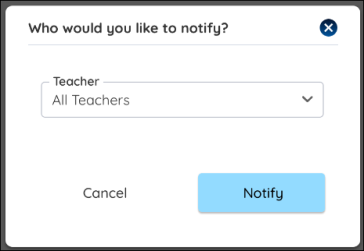
- If you’re adding to the School Customization shared bookshelf, you’ll see the "Who would you like to notify?" dialog. Select All Teachers or the teacher(s) you want to notify and select Notify. A notification with information about a shared customization is sent to the teachers selected.
|
|
The "Who would you like to notify?" modal only appears when adding to the School Customization shared bookshelf. |
View School Customization Library notifications
You can view Shared Bookshelves notifications by using the Inbox button.
- Click Inbox on the Dashboard.
- Click the customization notification message in the Subject area. The message appears with the shared customization link(s).
- Select a shared customization link. The School Customization Library area in the Shared Bookshelves modal appears. The shared customization has a yellow border.
- Click the shared customization with the yellow border. The shared customization opens.
Edit a shared customization
There are two ways you can edit a shared customization. How you edit a shared customization is based on your role as either an author or recipient of a shared customization.
|
|
You can also edit a customized ePocket Chart from the Shared Bookshelves if you’ve added it there. See more information about editing ePocket Chart files here. |
If you are using a library (not the School or District Shared Bookshelves) or bookshelf
These instructions only apply to editing customizations that have been shared and are available in the Shared Bookshelves.
- Select the original customization you shared from your library or bookshelf.
- Click the book cover to open the customization. The customization appears in Present mode.
- Click the Edit mode (Hammer/Paintbrush) icon at the top of the ebook page.
- Click the My Customizations arrow located at the left of an ebook page. The My Customizations panel appears.
- Click the Pencil icon and edit the customization title.
- Edit the customization as needed and save.
- Go back to Benchmark Universe.
If you are using the Shared Bookshelves
- Find the customization in the Shared Bookshelves.
- Click the book cover to open the customization. The customization appears in Present mode.
- Click the Edit mode (Hammer/Paintbrush) icon at the top of the ebook page.
- Edit the customization as needed and save.
- Go back to Benchmark Universe.
- Go to the Shared Bookshelves modal.
- Find the shared customization you want to edit.
- Click the Gear icon and select Add to Another Bookshelf. The Bookshelf panel appears.
- Select one of your personal bookshelves. The bookshelf block number is updated.
- Go to your personal bookshelf and find the shared customization you want to edit.
- Click the book cover to open the customization. The customization appears in Present mode.
- Click the Edit mode (Hammer/Paintbrush) icon at the top of the ebook page.
- Click the My Customizations arrow located at the left of an ebook page. The My Customizations panel appears.
- Click the Pencil icon and edit the shared customization title.
- Edit the shared customization as needed and save.
|
|
You can also drag shared customizations to your personal bookshelves instead of using the Gear menu. |
Remove a shared customization
You, as the original author of a shared customization, can remove a customization from the Shared Bookshelf by using the Resource Options modal.
- Find the desired customization and select the More Options icon.
- On the Resource Options modal, press the Remove from Bookshelf button.
Last Updated: June 20, 2023